I'm really lazy when it comes to updating a news post, but I might as well update it now with something.
I want to share the interesting input of how this art process video worked in my view point.
There is a second part to this video too
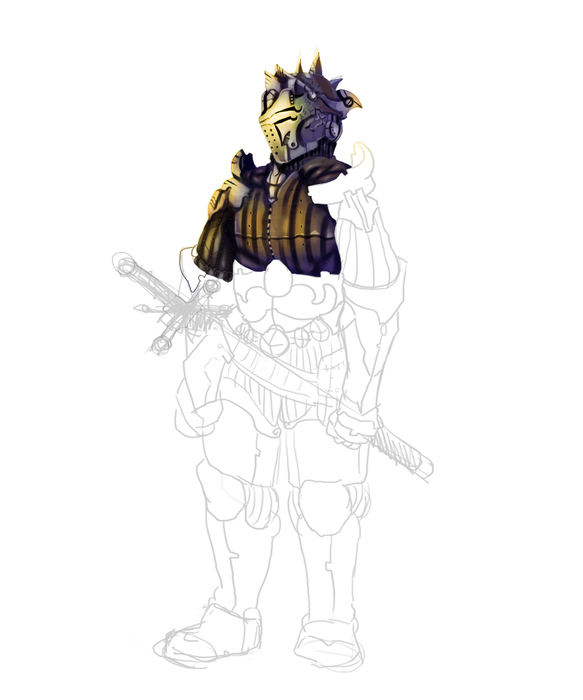
In the image below I did half the job done to get an idea on how coloring line art work to understand through the artist of that video.
A first step would be a small canvas size (I started 833x1000 pixels) sketch to get your general idea down and anatomy too. You don't have trace exactly what your sketch is in your lineart unless you want to.
Second step is to increase the canvas size to a large scale ( I personally increased it to 6000x7200 pixels). Then I use a hard round brush with a size of maybe 2-6 pixels to trace over the sketch. I didn't care on the line art being smooth, but being focus on making sure the lines connect. I never finish the whole lineart process because it was boring for me but I got what I wanted from what I got so far. I use a magic wand tool to select the outside side of the lineart then reverse the selection and filled it with a purple color in a new layer.
Third step is to lock the transparency of the filled layer since it got the shape of the form I needed. Using the line art as guidelines now, I shade like I always do and even shade that does not follow the guidelines of the lineart. You'll eventualy notice that in some areas that you made of left tiny white pixels that surround your line art is an eyesore, but it won't matter.
Last step in to reduce the size of the image (I went 833x1000), the crooked lines and little pixels wouldn't matter because of how the viewers first impression would be the overall composition of your art and that the removing and reconstruction of certain pixels when you've reduced the size would make it unnoticeable.
------------------------------------------------
------------------------------------------------
------------------------------------------------
--------
Credit of the videos go to Genzoman for his skill anime works and coloring plus his awesome go about way with photoshop.
Imaginefx is a great video source on observing how a professional artist do their work in either real time, step by step explanation of their process, or breaking it down for us to understand.
------------------------------------------------
------------------------------------------------
------------------------------------------------
----
The program I used is photoshop cs3
Any art program that worked generally the same as photoshop would be fine too.
I'ved used 5 layers on what i=I've drawned
1- the pre anatomy form to get the pose and body shape right
2- the sketch of the knight warrior would look like
3- the line art
4- the filled locked transparency layer that I shaded and detail in, which goes below the lineart.
5- an effect layer called "overlay" in which I used a yellow-green color to color over the light hitting surface of the overall art itself.
------------------------------------------------
------------------------------------------------
---------------------------------
Always wonder what the real size of certain amazing artwork......because some artists may of did similar methods or because they don't like art thief.